The internet is rife with so many data breaches and confidential data hacking stories. If you want to avoid this for your website, then you will need to install SSL certification on your WordPress website.
If you intend to collect ANY information on your website, then you should make sure that your website has an SSL Certificate. And if you are not secured by an SSL certificate, then you are unfortunately turning away many of your prospects.
After releasing Chrome 62, even Google began to punish the websites that didn’t have an SSL certificate or an HTTPS extension.
Thus, having an SSL certificate is not only good for your website’s security and confidential data but also for your search engine rankings.
But the question is: How would you install an SSL certificate and enable HTTPS on your WordPress website?
This article will cover all the important details; from how to install the SSL certificate on WordPress to how to choose the right one for you.
The installation is typically performed by the hosting company whose services you avail and then you are required to tweak a couple of core WordPress files. If you don’t want to go through all this hassle, then you can skip this altogether and instead use a plugin to do it for you.
What Is an SSL Certificate?
SSL stands for “secure sockets layer” and is the security protocol that establishes an encrypted link between the web server and the browser. This link alleviates any problem of third-party authorization and man-in-the-middle attack.
The SSL certificate, which is often depicted by a padlock on the left-hand side of a URL also relays that the website is indeed legitimate and can be browsed through securely.

After you install the SSL certificate for your website, the regular HTTP is changed to HTTPS, a way to ensure your audience that the connection between the browser and the server is secure.
However, not all SSL certificates are similar. There are different types of SSL certificates out there with different benefits, pricing, and features.
Choosing the Right SSL Certificate for Your WordPress Site
Before starting the installation process, it is important to discern which SSL certificate is the right fit for your WordPress website. You should choose SSL as per website requirement, especially if you are running an E-commerce business.
Usually, there are three types of SSL certificates you can choose from Domain validated, Organization validated and Extended validation.
Domain Validated Certificate that carries minimum validation in the form of DV and can be issued within a few minutes.
Organization validated SSL certificates are substantially more expensive and protect your website against all kinds of malicious attacks. OV certificates contain legitimate business information.
Extended validated SSL certificates are much more stringent in terms of security and fighting problems like man-in-the-middle attacks.
Where Can You Buy an SSL Certificate?
You can purchase and install an SSL certificate right away from services like different certificate authorities like Symantec, Comodo, GlobalSign as well as other providers.
Before buying an SSL certificate you should also check for providers/resellers that offer SSL certificates at the lowest price. One of them is SSL2BUY that carries various types of SSL certificates at the lowest price.
However, choosing SSL types depends upon the site requirement whether it could be a wildcard SSL certificate for securing unlimited subdomains or multi-domain SSL to secure multiple different domains.
How to Install an SSL Certificate on WordPress
You can either use a WordPress plugin to install your certificate without any hassle. However, for long-term use, it’s better to do it manually. Here are some of the ways to install your certificate on WordPress:
Install an SSL certificate on WordPress Using a Plugin
Installing an SSL certificate on WordPress using a plugin is a simple, two-step process.
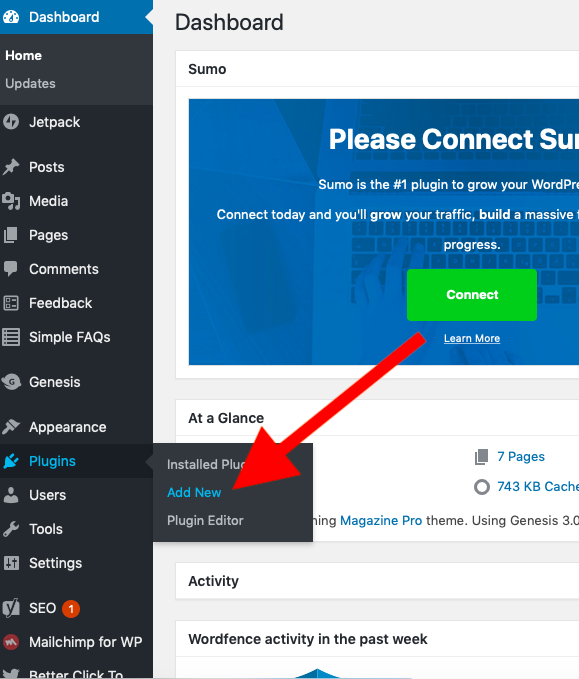
Simply, go to the “plugins” section in your WordPress cPanel, then click on “add new.”
Next, search for any plugin that can help you with your SSL installation (such as Really Simple SSL plugin) and install it.
Once you are done installing it, head to “settings > SSL.”

In this window, you will be able to see your current status, including any possible errors.
From the installation process to the configuration, the plugin has you covered for just about everything.
After you are done with everything, you will be prompted to reload the page to transform HTTP into HTTPS.
Remember, your SSL plugin should always be active. Otherwise, it may end up facing mixed content errors.
However, since this solution may impinge on your site’s performance, it’s important to do it manually.
Here’s how you can do it.
Install an SSL certificate on WordPress (Manually)
Setting up an SSL certificate manually requires you to troubleshoot and edit core files manually. However, this process is not only more viable but more optimized and permanent.
First, visit the “Settings” General page.
Here, you need to update your WordPress as well as the Site Address URL with https (after removing HTTP).
Save your changes and then you will be promoted to logout. Next, re-login to see the change.
Next, open an FTP client and find .htaccess file in your root directory. If you are unable to find it in the root directory, make sure you allow your FTP client to show hidden files.
Add the following code to your .htaccess file.
<IfModule mod_rewrite.c>
RewriteEngine On
RewriteCond %{HTTPS} off
RewriteRule ^(.*)$ https://%{HTTP_HOST}%{REQUEST_URI} [L,R=301]
</IfModule>
If by any chance you are using Nginx servers, then use the following code:
server {
listen 80;
server_name example.com www.example.com;
return 301 https://example.com$request_uri;
}
Replace example.com with your own domain name.
Your WordPress is finally using HTTPS instead of HTTP. However, now you need to make sure that it uses an SSL certificate as well.
For that, find “wp-config.php” in your FTP client and the following code above the line that says, “that’s all, stop editing.”
define (‘FORCE_SSL_ADMIN’, true);
Now your website is completely set up to use SSL/HTTPS.
However, you still need to eliminate mixed content errors, which means that some elements in your website, like images and scripts, might be still loading using HTTP instead of HTTPS.
To eliminate this issue, install the Better Search Replace plugin. It will scour through all your WordPress elements and databases and update them to HTTPS from HTTP.
After installation, head to “tools > Better Search Replace” to open the menu.
Finally, enter your old URL with the HTTP extension in the “Search for” field and your new URL with the HTTPS extension in the “Replace with” field. Select all the tables in the section below to make sure everything is scanned properly.
You don’t need to update any files, just check the “run as a dry run” box to browse through your complete database.
Now your website will load with your SSL certificate and HTTPS extension.
Wrap Up
If you are having a hard time going through the whole process yourself, then consider contacting a professional to do it for you.
Also, select while purchasing an SSL certificate for your WordPress site, make sure to keep your budget and requirements in mind, and choose your SSL package wisely.
As you can see, the installation process will be over in a jiffy, so make sure that you are not overlooking this pressing task anymore and alleviate your audience’s worries. On top of that, having an SSL certificate also works out wonders for your Google ranking.